
 |
 |
 |
 |
 |
 |
 |
 |
 |
 |
 |
 |
 |
 |
 |
 |
 |
 |
 |
 |
 |
 |
 |
 |
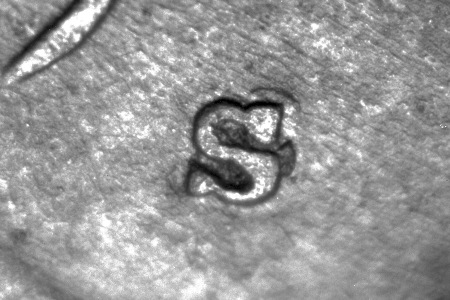
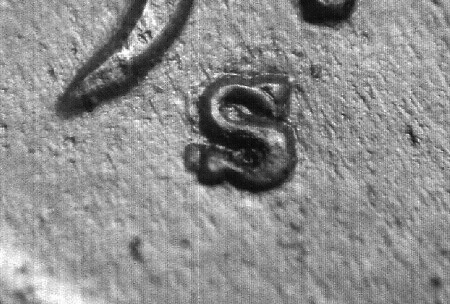
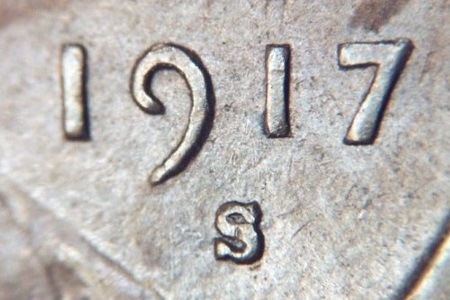
1909-S 1¢ WRPM-001 "Best Of" Variety Description: S/Horizontal S Die Markers: Obverse Stage A: Very strong horizontal secondary mintmark showing nearly full details. Lathe marks in the lower bust. Obverse Stage B: Secondary mintmark is slightly weaker showing slight loss of detail NW of the primary mintmark. Die gouge south of the first 9 in the date and in alignment with the lower mintmark, running diagonally NW/SE. Heavy abrasion in the first two folds of the vest. Lathe marks in the lower bust are gone. Obverse Stage C: Secondary mintmark much weaker. Heavier abrasion shows in the vest folds, the area of the date and mintmark. Die chips show above the E of LIBERTY. Reverse Stage A: Clogging of the die shows on the upper opening of the E of EPU. Reverse Stage B: Very weak die crack on the right side of the right wheat grains at 4 o'clock. Reverse Stage C: Die crack at wheat grains is stronger and runs SE into the rim. An irregular N/S die crack runs through the wheat grains slightly above the original crack. Submitted By: Stage A & C: Lloyd Hanson, Stage B: Kevin Flynn (upgraded coin submitted by Lloyd Hanson) Cross References: Breen #2058, CONECA: RPM #2, Cherrypickers: FS-01-1909S-502 (012.3), Coppercoins: 1909S-1MM-002 Top 100 RPM: Wexler and CONECA
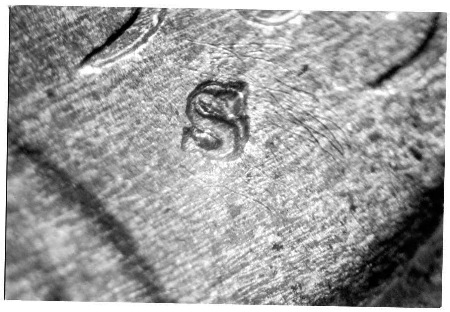
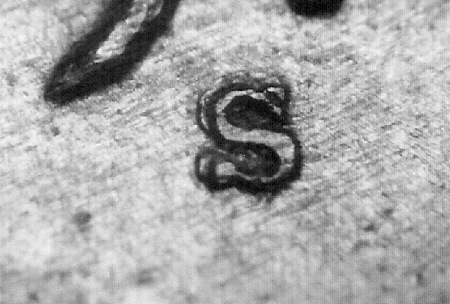
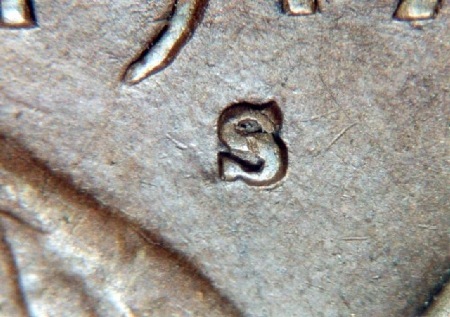
1909-S 1¢ WRPM-002 "Best Of" Variety Description: S/S Northeast Die Markers: Obverse Stage A: Two die scratches slightly above center, inside the D in GOD and running NW/SE. Two die scratches from the vertical bar of the D in GOD, one running WNW to the O in GOD and the higher scratch running NW toward the rim. Heavy die scratches around the mintmark area. Obverse Stage B: Stage A scratches very weak. Obverse Stage C: Die chip slightly SE of the bust tip. Obverse Stage D: Series of die chips (dots) above the I of LIBERTY. Die clash at throat and bow tie area. Obverse Stage E: Die clash abraded away. Most markers are gone. Obverse Stage F: This stage is questionable. An example was presented that shows a large die break and a rim cud at 2:00 o'clock. More examples are needed to verify if this was actual or from a bad planchet. Reverse Stage A: Die chip in the field left and center of the L in PLURIBUS. Reverse Stage B: Light die scratch through the upper second U and M of UNUM. Reverse Stage C: Weaker stage A markers. Reverse Stage D: Scratch through the second U and M of UNUM abraded away, only the scratch on the upper right side of the vertical bar of the M remains. Reverse Stage E: All previous markers are gone. Reverse Stage F: This stage is questionable. An example was presented that shows a large die break and a rim cud at 3:30 o'clock. More examples are needed to verify if this was actual or from a bad planchet. Submitted By: Stage A, B, C, E, & F: Lloyd Hanson, Stage D: Doug Yost Cross References: CONECA: RPM #1, Cherrypickers: FS-01-1909S-501 (012.2), Coppercoins: 1909S-1MM-001 Top 100 RPM: Wexler and CONECA
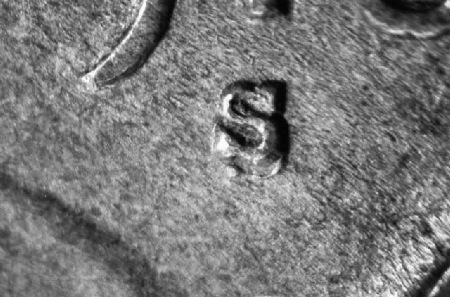
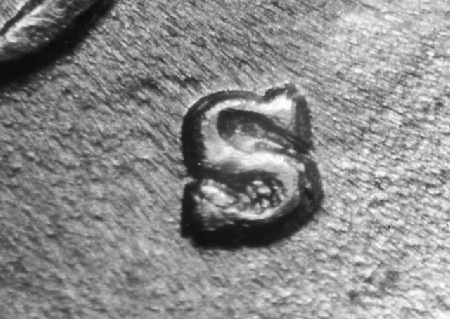
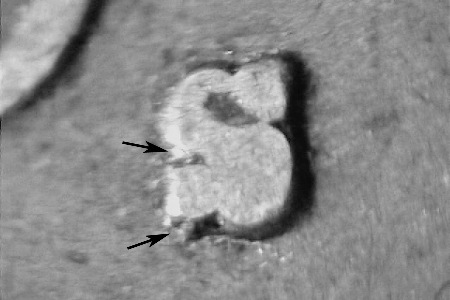
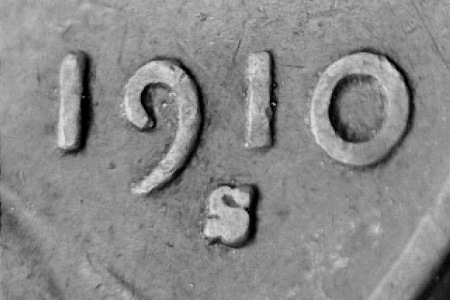
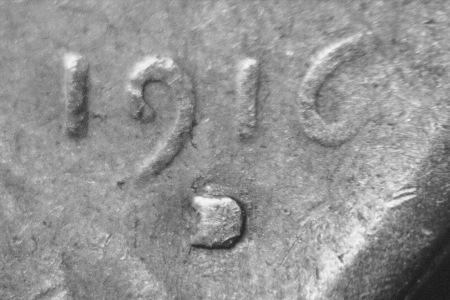
1910-S 1¢ WRPM-001 "Best Of" Variety Description: S/S South Die Markers: Obverse Stage A: Two overlapping, inverted V shaped (M appearance) die scratches to the left of the lower tail of the 9 in the date. Obverse Stage B: Short die scratch east from the right side horizontal bar of the second T in TRUST. Obverse Stage C: Weaker stage A markers. Obverse Stage D: Stage A marker are worn away. Reverse Stage A: Series of E/W die scratch inside the second U of UNUM. Reverse Stage B: Very light die crack from a position at 8 o'clock from the rim. Reverse Stage C: Heavily chipped die crack from a position at 8 o'clock from the rim NE to and halfway through the left wheat grains. Reverse Stage D: Die crack is stronger on the south side. Submitted By: Stage A: Kevin Flynn, Stage B: Lloyd Hanson, Stage C: Lloyd Hanson, Stage D: Lloyd Hanson Cross References: Breen #2061, CONECA: RPM #1, Coppercoins: 1910S-1MM-001, Cherrypickers: FS-01-1910S-501 Top 100 RPM: Wexler and CONECA
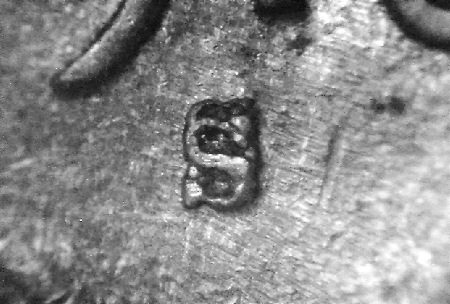
1910-S 1¢ WRPM-002 "Best Of" Variety Description: S/S North Die Markers: Obverse Stage A: Swirling die scratches around the mintmark. Strong die scratches north from the rim at 4:30 o'clock. Obverse Stage B: Very weak east die crack beginning to form from the rim at 9:30 o'clock. Obverse Stage C: Die crack from rim is stronger and declines very slightly SE. Obverse Stage D: Die crack from the rim is much stronger and runs about half the distance to the head. Reverse Stage A: Series of arching die scratches to the right of the right wheat ear. Reverse Stage B: Scratches at wheat ear is weaker. Reverse Stage C: Die crack east from the rim at 9 o'clock to the left wheat grains. Die crack from the rim at 4 o'clock running NW to the right wheat grains. Reverse Stage D: Die crack on the left is heavier and extends into the grains. Submitted By: Stage A & B: Lloyd Hanson, Stage C: Doug Yost, Stage D: Paul Funaiole Cross References: Breen #2061, CONECA: RPM #2, Coppercoins: 1910S-1MM-002, Cherrypickers: FS-01-1910S-502 (012.7) Top 100 RPM: Wexler and CONECA
1910-S 1¢ WRPM-003 Description: Inverted S/Inverted S East Die Markers: Obverse Stage A: Die clash behind the head at the lower hair and neck area. Die clash at the throat. Die scratch north at the left side of the D of GOD and then curving NNE into the rim. NW/SE die scratch inside the O of GOD at the lower left. Obverse Stage B: Weaker stage a markers. Obverse Stage C: Die crack E/W across the bust and then curving NW along and to the back of the shoulder. Obverse Stage D: Most markers gone. Reverse Stage A: U-shaped die scratch on the left side vertical bar of the E in STATES below mid-point. Reverse Stage B: Depression at the rim at 4:30 o'clock. Reverse Stage C: Die crack at the rim at about 8:00 o'clock running NE to the wheat grains. Reverse Stage D: Rim cud replaces the stage B depression. Submitted By: Stage A: Lloyd Hanson, Stage B: Doug Yost, Stage C & D: Lloyd Hanson Cross References: CONECA: RPM #3, Coppercoins: 1910S-1MM-003
1910-S 1¢ WRPM-004 Description: S/S Tilted (Rotated) Die Markers: Obverse: None visible. Circulated specimen was examined. Better examples are needed for examination. The mint mark is positioned similar to WRPM-003 but primary mint mark leans CW. Reverse: None visible. Circulated specimen was examined. Better examples are needed for examination. Submitted By: Christopher Ohanian Cross References: None known
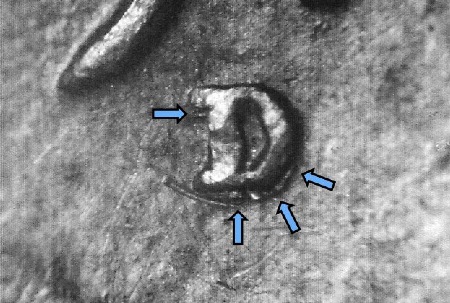
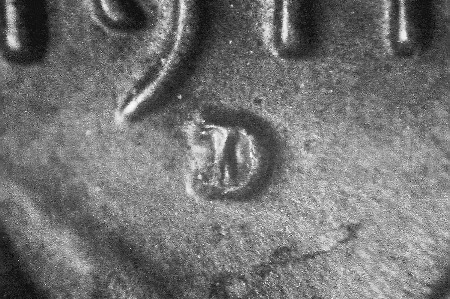
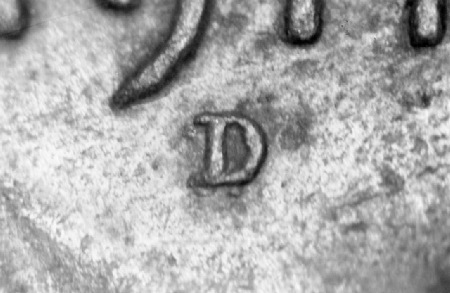
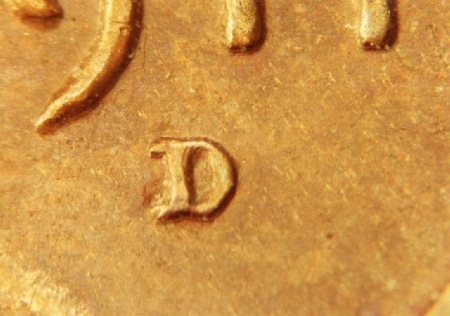
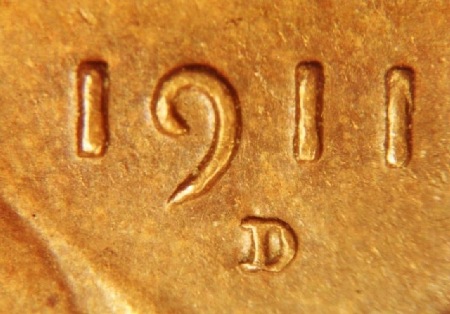
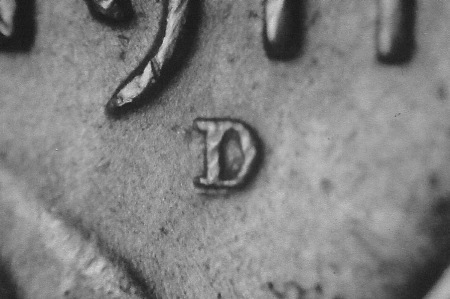
1911-D 1¢ WRPM-001 "Best Of" Variety Description: D/D Southwest Die Markers: Obverse: Slightly curving NW/SE die scratch under the 19 of the date. Reverse: None recorded. Submitted By: Paul Funaiole Cross References: CONECA: RPM #1, Cherrypickers: FS-01-1911D-501 (012.8), Coppercoins: 1911D-1MM-001 Top 100 RPM: CONECA
1911-D 1¢ WRPM-002 "Best Of" Variety Description: D/D South Die Markers: Obverse: None visible. Circulated specimen was examined. Reverse: None visible. Circulated specimen was examined. Submitted By: Paul Funiaole Cross References: CONECA: RPM #2, Cherrypickers: FS-01-1911D-502 (012.81), Crawford: CRPM-002, Coppercoins: 1911D-1MM-002 Top 100 RPM: CONECA
1911-D 1¢ WRPM-003 "Best Of" Variety Description: D/D Tilted (Rotated) Die Markers: Obverse: Small die dot in the field from the left lower side of the R in TRUST. Reverse: Die crack from the rim at 2:30 running west through the wheat ear. A second die crack intersects the previous crack and runs N/S along the right wheat edge. A NE/SW die crack runs along the lower right wheat grains. Submitted By: Paul Funaiole (Upgraded by John Bordner) Cross References: CONECA: RPM #3, Cherrypickers: FS-01-1911D-503 (012.82), Crawford: CRPM-003, Coppercoins: 1911D-1MM-003 Top 100 RPM: CONECA
1911-D 1¢ WRPM-004 "Best Of" Variety Description: D/D/D South & Southeast Die Markers: Obverse Stage A: Shows strong curve on secondary mint mark at the SE area and vertical bar inside. Die scratch, NW/SE located above the mint mark and between the 9 and the first 1 in the date. Obverse Stage B: Curve is gone on secondary mint mark and the vertical bar is still present. Obverse Stage C: Weak secondary mint mark. Strongest point is at the NW area of the secondary mint mark. Die chip (dot) at base of bust between 2nd and 3rd folds. Die chip (dot) in field and close to hair south of the O in GOD. Obverse Stage D: Die crack from the rim at 6:30 running NW to the bust and then turning and running WNW over the lower shoulder area. Reverse Stage A: Heavy gouges from rim at the left wheat ear above UNUM and at right wheat ear. Reverse Stage B: Weaker Stage A markers. Reverse Stage C: Die scratch at underside of the center bar of the E in ONE. Reverse Stage D: Die crack from the rim at 2:45 and running SW to the wheat ear. Submitted By: Stage A: John Bordner, Stage B: Paul Funaiole, Stage C: Brian Allen, Stage D: Mike Bruggerman Cross References: CONECA: RPM #4, Cherrypickers: FS-01-1911D-504 (012.83), Crawford: CRPM-001, Coppercoins: 1911D-1MM-004 Top 100 RPM: CONECA Comments: I would welcome the opportunity to photograph a higher grade specimen of this variety.
1911-D 1¢ WRPM-005 Description: D/D Tilted (Rotated) Die Markers: Obverse: Die chip (dot) in the field east of the throat. Reverse: Two very light, nearly E/W die scratches connect the B and I of PLURIBUS. Submitted By: David P. Smith Cross References: None known
1911-D 1¢ WRPM-006 "Best Of" Variety Description: D/D South Die Markers: Obverse: None visible. Circulated specimen was examined. Reverse: Die crack NW from the rim at 4:30 running to the right wheat ear. Submitted By: John A. Wexler Cross References: None known
1911-S 1¢ WRPM-001 "Best Of" Variety Description: S/S West Die Markers: Obverse Stage A: NW/SE die scratches inside 9 of date. Obverse Stage B: Weaker stage A markers. Obverse Stage C: Die scratch below beard. Reverse Stage A: Die crack from the rim to the right wheat ear at 4:00. Reverse Stage B: The die crack from the rims runs along the right edge of the right wheat ear and exits at 2:45 forming a chip at the wheat ear. Reverse Stage C: New reverse die. Three light die cracks from the rim to the wheat ear at 2:00, 3:00 and 4:30. Submitted By: Stage A: Paul Funaiole, Stage B: Doug Yost, Stage C: Lloyd Hanson Cross References: CONECA: RPM #1, Cherrypickers: FS-01-1911S-501 (012.85), Coppercoins: 1911S-1MM-001 Top 100 RPM: CONECA
1911-S 1¢ WRPM-002 "Best Of" Variety Description: S/S West Die Markers: Obverse Stage A: The mint mark is higher and further from the second 1 of the date than WRPM-001. Short E/W die scratch right of the eye. Obverse Stage B: Small die gouge inside the D of GOD, centered at the right curve. Obverse Stage C: Large die crack in hair. Die cracks between WE and TRUST. Reverse Stage A: Die crack at the rim at 3:30 that runs NW to the wheat ear. Reverse Stage B: New reverse die. Die crack east from the wheat ear at 3:00. Reverse Stage C: Stronger die crack from the wheat ear. Submitted By: Stage A: John Bordner, Stage B: Paul Funaiole, Stage C: Lloyd Hanson Cross References: CONECA: RPM #2
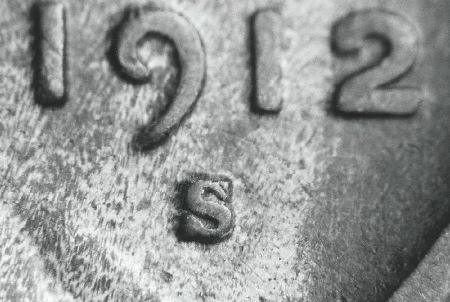
1912-S 1¢ WRPM-001 "Best Of" Variety Description: S/S East Die Markers: Obverse Stage A: Small die chip (dot) right of the 9 in the date about one-fourth up from the bottom. Small strong chip below bust between the last fold and the back. Strong secondary mint mark. Obverse Stage B: Stage A markers gone except for a weaker chip below the bust. Weaker secondary mint mark. Obverse Stage C: Die crack from the bust to the rim right of the die chip. Very mushy mint mark. Reverse Stage A: Vertical die scratch inside the O of ONE closer to the right. Reverse Stage B: Weak stage A markers. Reverse Stage C: Stage A markers are abraded away. Submitted By: Stage A: Lloyd Hanson, Stage B: Doug Yost, Stage C: John A. Wexler Cross References: CONECA: RPM #1, Coppercoins: 1912S-1MM-001
1912-S 1¢ WRPM-002 Description: S/S East Die Markers: Obverse: None visible. Circulated specimen was examined. Reverse: Long N/S die scratch between the upper right wheat ear and the rim. Submitted By: Lloyd Hanson Cross References: None known
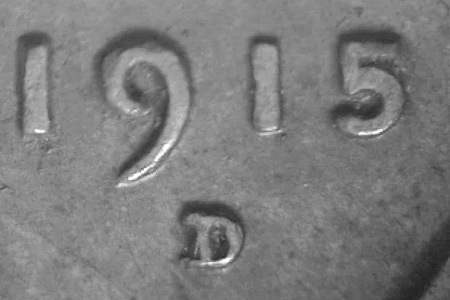
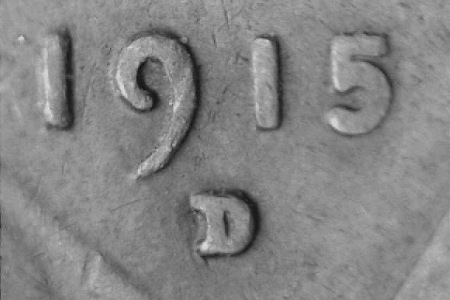
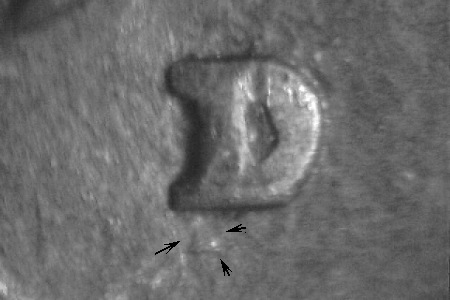
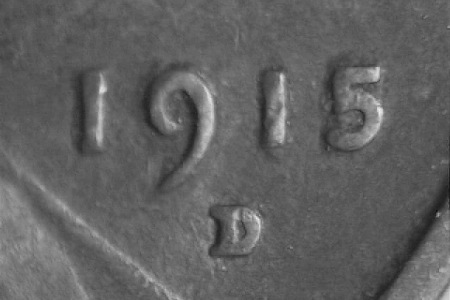
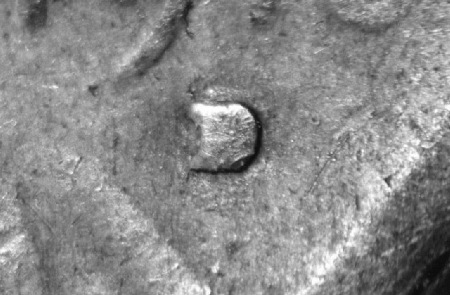
1915-D 1¢ WRPM-001 Description: D/D Tilted (Rotated) Die Markers: Obverse: Circulated specimen examined. Higher grade needed. Reverse: Circulated specimen examined. Higher grade needed. Submitted By: Eric Axtell (updated by Chad King) Cross References: CONECA RPM #1, Coppercoins: 1915D-1MM-001
1915-D 1¢ WRPM-002 Description: D/D Tilted (Rotated) Die Markers: Obverse: None visible. Circulated specimen was examined. Reverse: None visible. Circulated specimen was examined. Submitted By: Lloyd Hanson Cross References: None known
1915-D 1¢ WRPM-003 "Best Of" Variety Description: D/D South Die Markers: Obverse: None visible. Circulated specimen was examined. Better examples are needed for examination. Reverse: None visible. Circulated specimen was examined. Better examples are needed for examination. Submitted By: Eric Axtell Cross References: CONECA: RPM #2
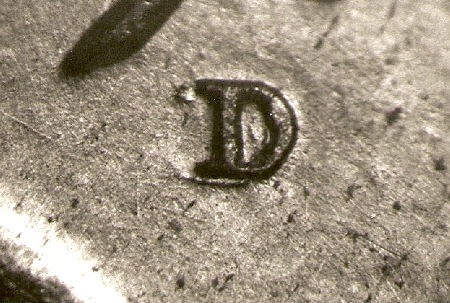
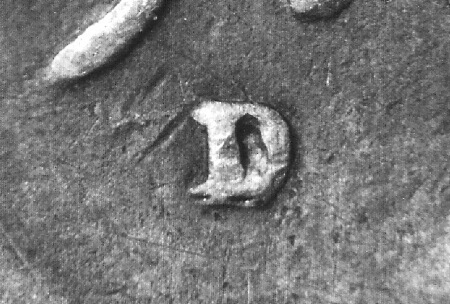
1916-D 1¢ WRPM-001 Description: D/D Northeast Die Markers: Obverse: Primary mint mark is filled from a clogged die. Reverse: None visible. Circulated specimen was examined. Submitted By: John Bordner Cross References: None known Comments: While this does appear to be an RPM, the specimen examined was clearly a low grade coin. I would welcome the opportunity to study and photograph a high grade coin with this apparent doubling.
1916-D 1¢ WRPM-002
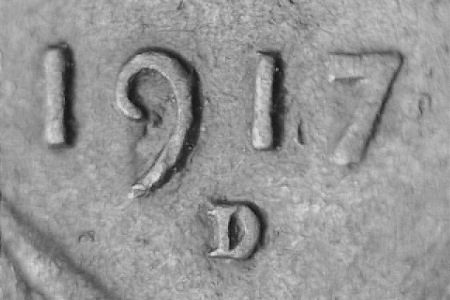
1917-D 1¢ WRPM-001 Description: D/D Tilted (Rotated) Die Markers: Obverse: None visible. Circulated specimen was examined. Better examples are needed for examination. Reverse: None visible. Circulated specimen was examined. Better examples are needed for examination. Submitted By: Christopher Ohanian Cross References: None known
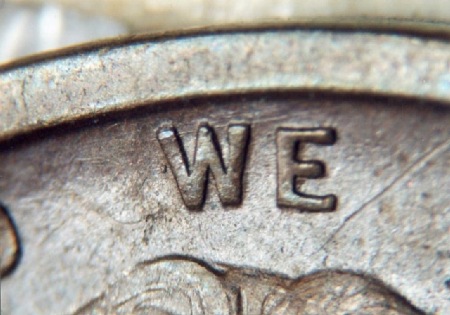
1917-S 1¢ WRPM-001 Description: S/S South Die Markers: Obverse: WSW/ENE die scratch through the upper area of WE. Die chip left of center from the W in WE. Reverse: Large die chip under the left wheat stem, positioned slightly above center. Large die chip left of the right tip of the wheat stem. Submitted By: Lloyd Hanson Cross References: None known
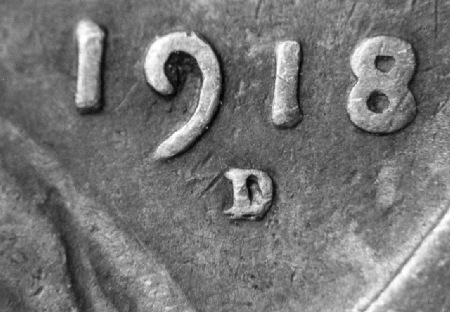
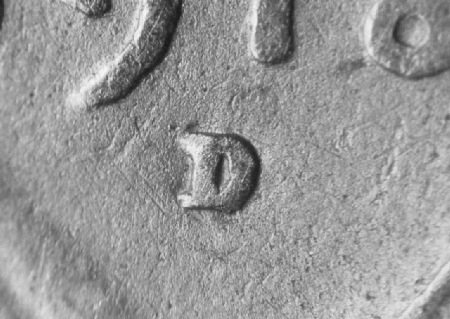
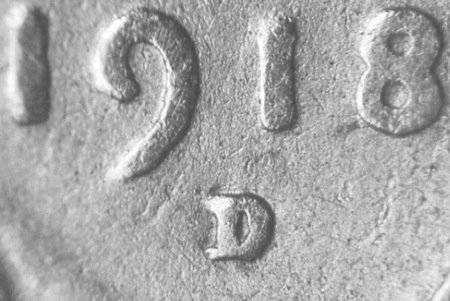
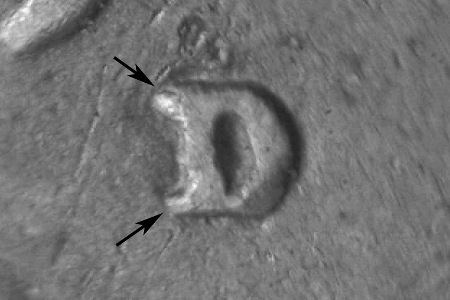
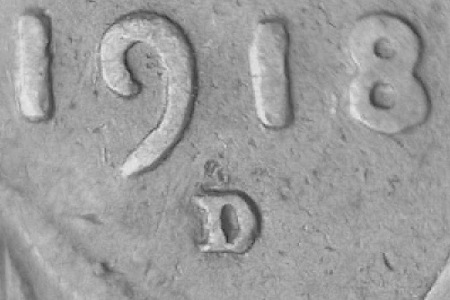
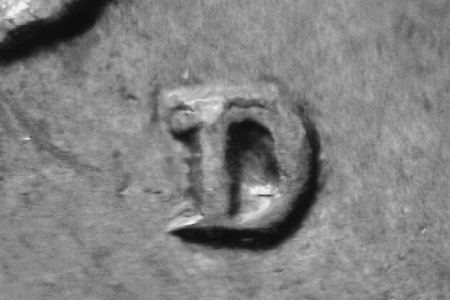
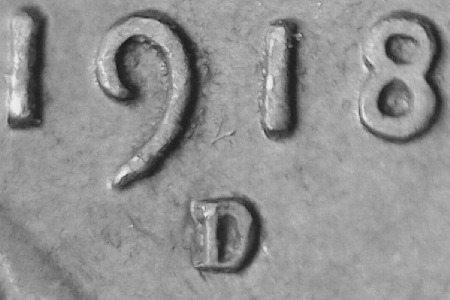
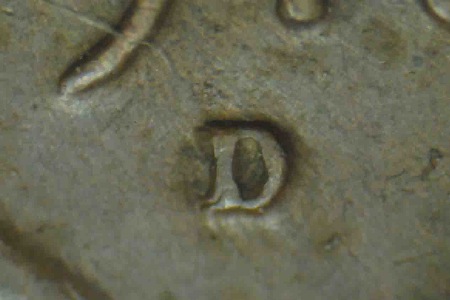
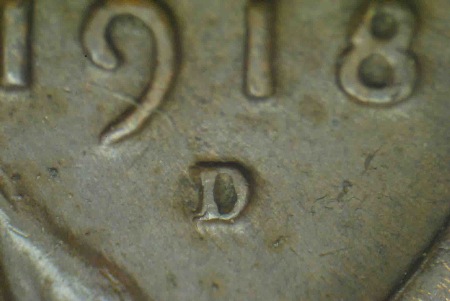
1918-D 1¢ WRPM-001 "Best Of" Variety Description: D/D South Die Markers: Obverse Stage A: None visible but the stage B die chips were not present. Circulated specimen was examined. Better examples are needed for examination. Obverse Stage B: Die chips on either side of the upper area of the L in LIBERTY. Light E/W die scratch between the lower area of the BE of LIBERTY. Small die chip inside the lower loop of the B and to the left lower area of the E in LIBERTY. Reverse Stage A: None visible but the stage B die chip at AMERICA was not present. Circulated specimen was examined. Better examples are needed for examination. Reverse Stage B: Die gouge in the field east from the upper area of the last A in AMERICA. Submitted By: Stage A: Lloyd Hanson, Stage B: Vaughn Zook (Upgraded by Brian Allen) Cross References: CONECA: RPM #1 Top 100 RPM: CONECA
1918-D 1¢ WRPM-002 Description: D/D Tilted (Rotated) Die Markers: Obverse: None visible. Circulated specimen was examined. Reverse: None visible. Circulated specimen was examined. Submitted By: Lloyd Hanson Cross References: None known
1918-D 1¢ WRPM-003 Description: D/D Tilted (Rotated) Die Markers: Obverse: None visible. Circulated specimen was examined. Better examples are needed for examination. Reverse: None visible. Circulated specimen was examined. Better examples are needed for examination. Submitted By: Lloyd Hanson Cross References: None known
1918-D 1¢ WRPM-004 "Best Of" Variety Description: D/D North Die Markers: Obverse: None visible. Circulated specimen was examined. Better examples are needed for examination. Reverse: None visible. Circulated specimen was examined. Better examples are needed for examination. Submitted By: James Hiironen Cross References: CONECA: RPM #2
1918-D 1¢ WRPM-005 Description: D/D Tilted (Rotated) Die Markers: Obverse: None visible. Circulated specimen was examined. Reverse: None visible. Circulated specimen was examined. Submitted By: Eric Axtell Cross References: None known
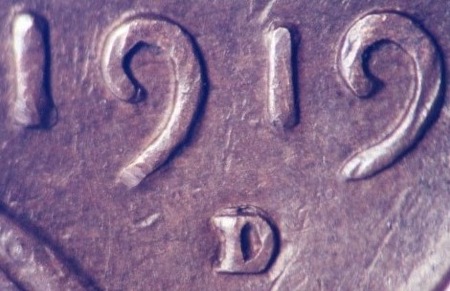
1919-D 1¢ WRPM-001 "Best Of" Variety Description: D/D North Die Markers: Obverse Stage A: Strong, well-defined secondary mint mark with a full upper "D". Obverse Stage B: Secondary mint mark is thin at the upper "D". Obverse Stage C: Secondary mint mark is very thin at the upper "D" and appears split when viewing with a 10x loupe. Reverse Stage A: None visible. Circulated specimen was examined. Reverse Stage B: None visible. Circulated specimen was examined. Reverse Stage C: None visible. Circulated specimen was examined. Submitted By: Stage A: Doug Yost, Stage B & C: Lloyd Hanson Cross References: CONECA: RPM #1, Coppercoins: 1919D-1MM-001 Top 100 RPM: CONECA
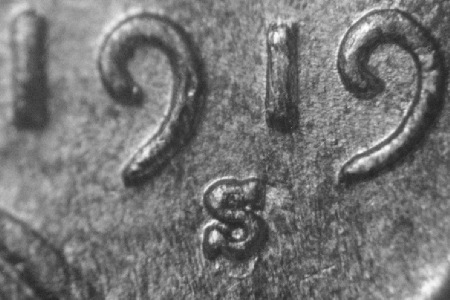
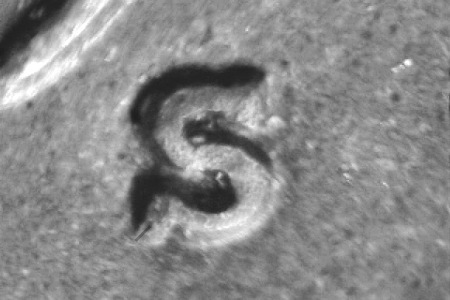
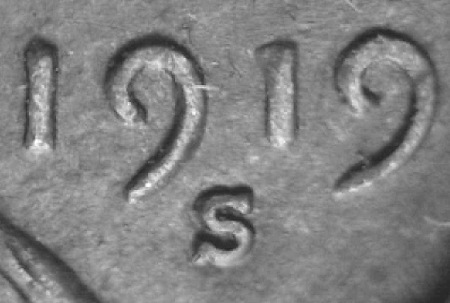
1919-S 1¢ WRPM-001 "Best Of" Variety Description: S/S South Die Markers: Obverse Stage A: Shows a full lower loop on the secondary mint mark. Die chip on the left side of the W of WE. NE/SW die scratch between GOD and WE. Obverse Stage B: Lower loop of the secondary mint mark is abraded away at the belly of the secondary mint mark. Obverse Stage C: The west and east portion of the secondary mint mark only present. Reverse Stage A: Light die crack and heavy abrasion from the E of EPU to the rim. Reverse Stage B: Stage A markers still present. No additional markers were visible. Reverse Stage C: Stage A markers still present. No additional markers were visible. Submitted By: Stage A & C: Lloyd Hanson, Stage B: Doug Yost Cross References: CONECA: RPM #1, Coppercoins: 1919S-1MM-001 Top 100 RPM: Wexler & CONECA
1919-S 1¢ WRPM-002 Description: S/S Tilted (Rotated) Die Markers: Obverse: None visible. Circulated specimen was examined. Better examples are needed for examination. Reverse: None visible. Circulated specimen was examined. Better examples are needed for examination. Submitted By: Marvin King Cross References: None known
| ||