
 |
 |
 |
 |
 |
 |
 |
 |
 |
 |
 |
 |
 |
 |
 |
 |
 |
 |
 |
 |
 |
 |
 |
 |
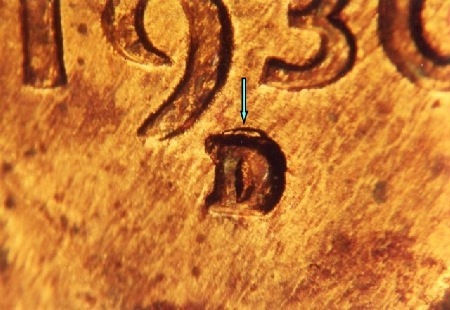
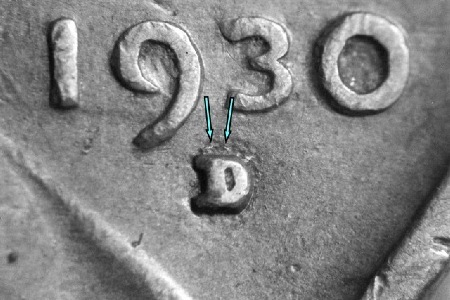
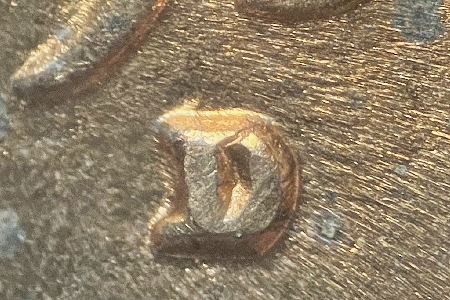
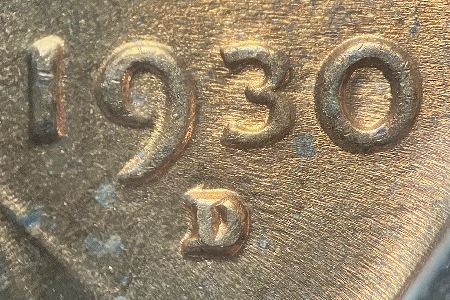
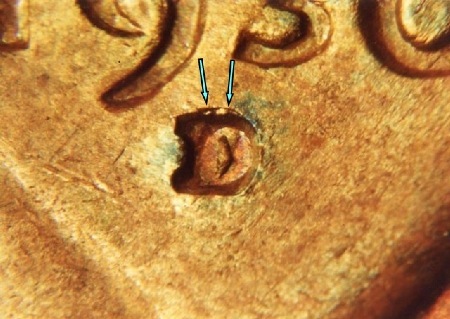
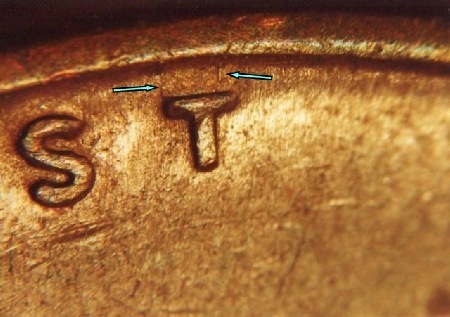
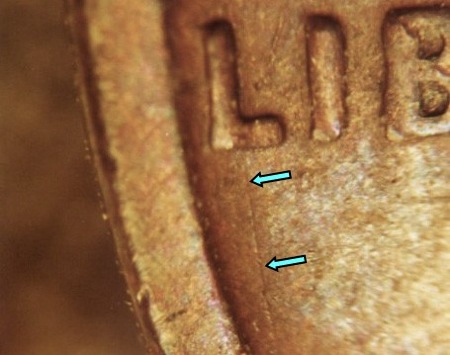
1930-D 1¢ WRPM-001 “Best Of” Variety Description: D/D North Die Markers: Obverse Stage A: Short die scratches north from the 0 in the date. Light and longer NNE/SSW die scratch left from the lower tail of the 9 in the date. Short N/ S gouge in the hair SW from the W in WE. Obverse Stage B: Stage A markers abraded away at date. Gouge at hair still present. Obverse Stage C: E/W die crack in the jacket well above the designer's initials. Lighter gouge in the hair still present. Reverse Stage A: Light die scratch NNW from the right upper area of the M of AMERICA to the D in UNITED and then continuing out through the left lower vertical bar of the D. Reverse Stage B: Die crack SW from the rim at 2:45 to the wheat grains and then running along the outer area of the wheat grains. Reverse Stage C: New reverse die. Die gouge above the first T in STATES, slightly right of center. Submitted By: Stage A: Lloyd Hanson (upgraded by John Bordner), Stage B: Lloyd Hanson, Stage C: Brian Allen Cross References: CONECA: RPM #1, Coppercoins: 1930D-1MM-001 Stage A:
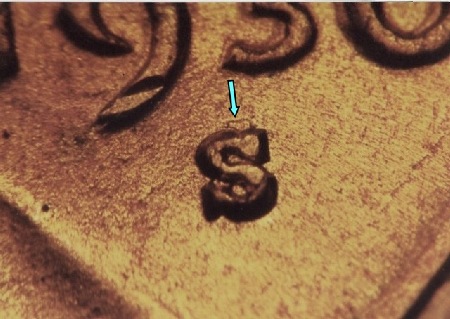
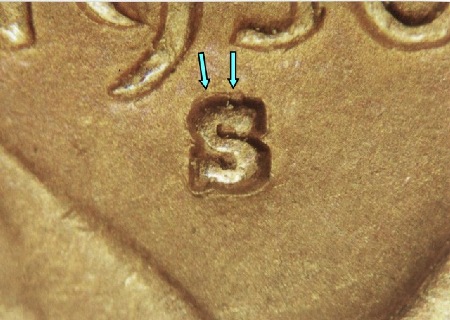
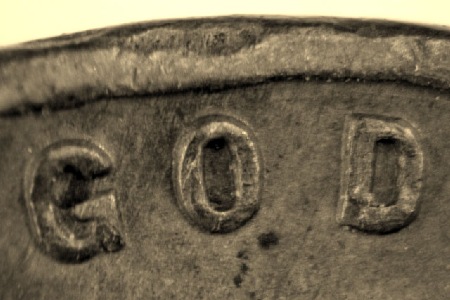
1930-D 1¢ WRPM-002 “Best Of” Variety Description: D/D North
Die Markers: Obverse Stage A: Shows remnants of a full secondary
curve above the primary mint mark. No other die markers visible as circulated
specimens were examined. Better examples are needed for examination. Obverse
Stage B: Shows remnants of a partial secondary curve above the
primary mint mark. No other die markers visible as circulated specimens were
examined. Better examples are needed for examination. Obverse
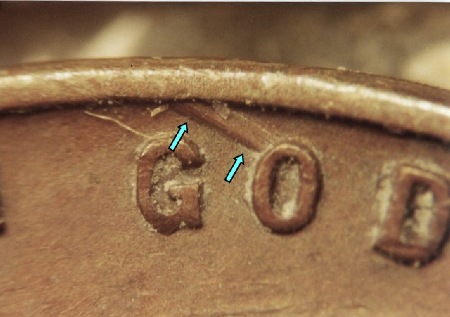
Stage C: A small die gouge
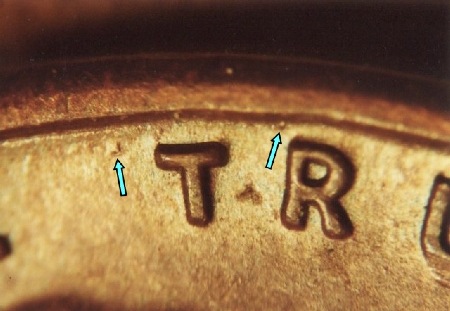
(dot) is present above the left side of the B in LIBERTY. Die gouge to the left center of G in
GOD. Die gouge (dot) to the left of the
lower R in TRUST. Light die crack from
the rim, crossing above V.D.B. and returning to the rim. Reverse
Stage A: None visible.
Circulated specimen was examined. Better examples are needed for
examination. Reverse Stage B: None visible. Circulated specimen was
examined. Better examples are needed for examination. Reverse
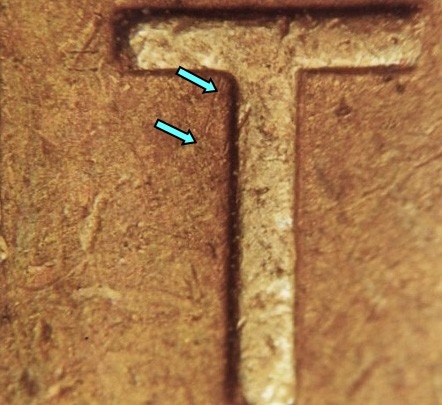
Stage C: Die gouge to the
right center of the S in PLURIBUS. Die chip
at the right end of the cross bar of the T in CENT and a die crack along the
right lower edge of the T.
Submitted By: Stage A: Doug Yost, Stage B: Lloyd Hanson, Stage
C: John Bordner (Updated photos on a coin from Keith Christenson) Cross References: CONECA: RPM #2, Coppercoins: 1930D-1MM-002, Cherrypickers: FS-01-1930D-502 (013.7) Top 100 RPM: CONECA Stage A:
Stage C:
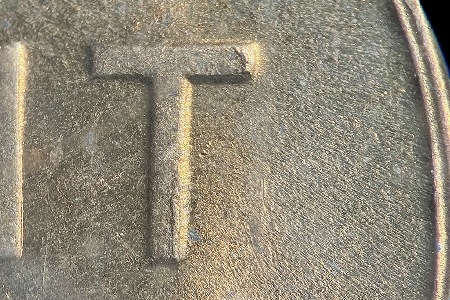
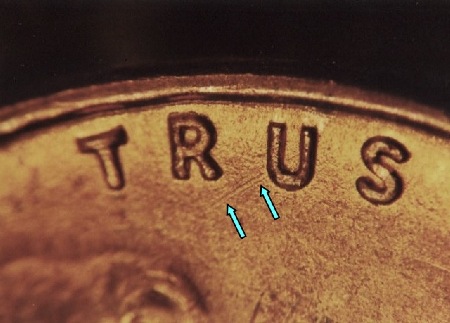
1930-D 1¢ WRPM-003 “Best Of” Variety Description: D/D North Die Markers: Obverse Stage A: SE die scratches below the bust. E/W die scratch through the vest west of the lower area of the 1 in the date. Obverse Stage B: Stage A scratches are weaker with the strongest scratch being at the last vest fold. Reverse Stage A: SSW die scratch from the left underside of the horizontal bar on the T in CENT. Slightly curving SSW die scratch from the upper left side of the vertical bar of the T in CENT. Reverse Stage B: Stage A scratches abraded away. Submitted By: Stage A: Brian Allen (upgraded by Lloyd Hanson), Stage B: Doug Yost Cross References: CONECA: RPM #3, Coppercoins: 1930D-1MM-003 Stage A:
1930-D 1¢ WRPM-004 Description: D/D Tilted (Rotated) Die Markers: Obverse Stage A: Die scratches south from both forks of the Y in LIBERTY. Strong secondary mint mark. Obverse Stage B: Stage A scratches gone. Die gouge from the left upper corner of the second T in TRUST to the rim. Die scratch above the right side of the second T in TRUST. Slightly weaker secondary mint mark. Reverse Stage A: Heavy metal pull between EPU and the rim, strongest at UNUM. Reverse Stage B: New reverse die. WSW die scratch from the left of the upper T in CENT. SW die scratches from the left underside of the horizontal bar of the T in CENT. Submitted By: Lloyd Hanson Cross References: CONECA: RPM #4, Coppercoins: 1930D-1MM-004 Stage A:
Stage B:
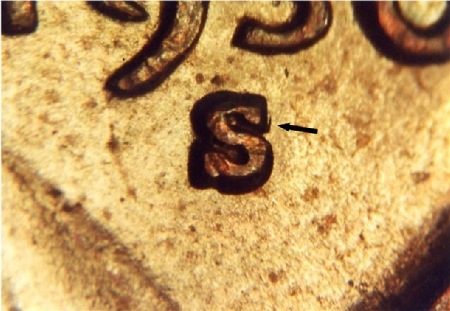
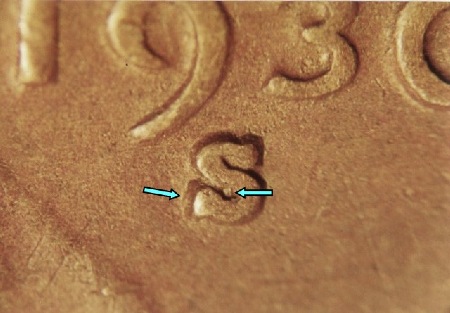
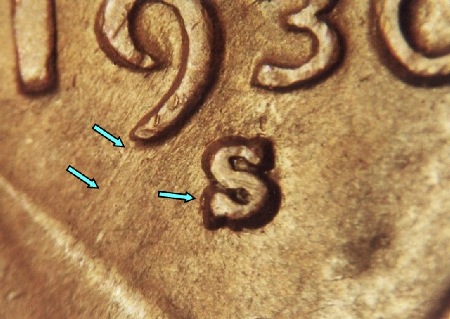
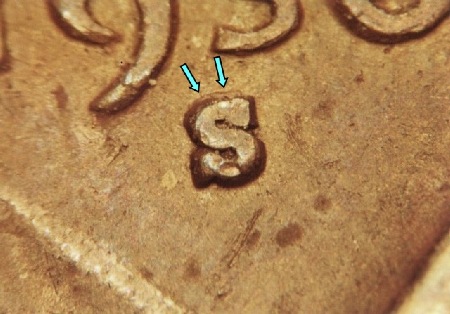
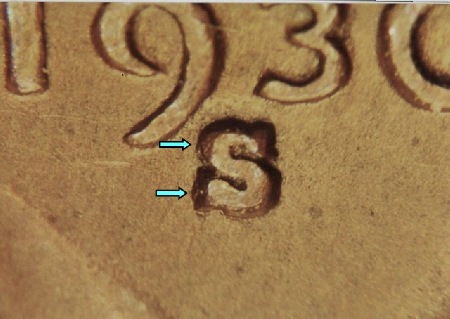
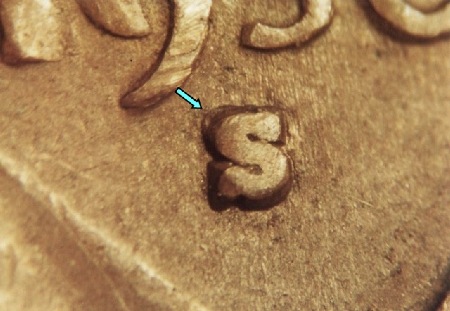
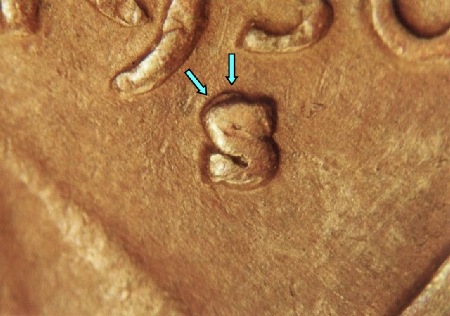
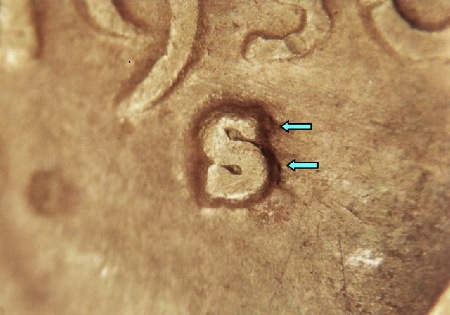
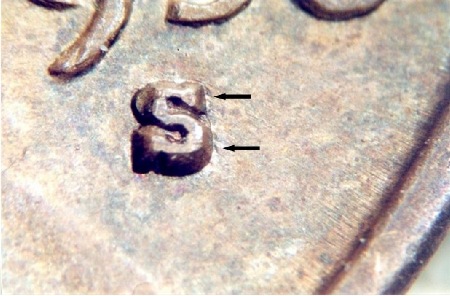
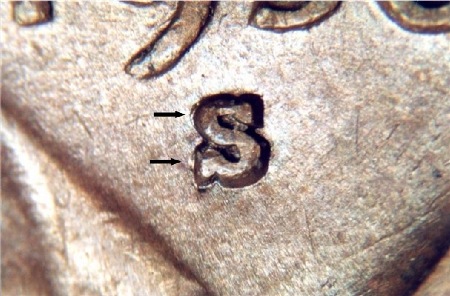
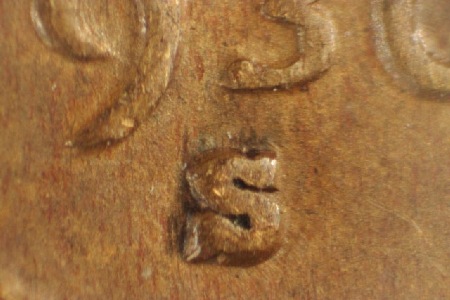
1930-S 1¢ WRPM-001 “Best Of” Variety Description: S/S North Die Markers: Obverse: Feeder finger gouge SW from the inside of the U in TRUST. Long, light die scratch south from the right leg of the R in LIBERTY. Reverse: Die chip on the right upper side of the T in CENT. Die chip inside the N of CENT near the point where the right vertical bar and the diagonal bar meet. Submitted By: Doug Yost Cross References: CONECA: RPM #1, Cherrypickers: FS-01-1930S-501 (0.13.73), Coppercoins: 1930S-1MM-001 Top 100 RPM: CONECA Comments: The photos of this variety were taken by John Bordner for the Wexler RPM Files.
1930-S 1¢ WRPM-002 Description: S/S North Die Markers: Obverse: Die chip on the jacket east of the Y in LIBERTY. Die scratch SE from the right side of the horizontal bar of the second T in TRUST. Lighter NW to SE die scratches through TRUST. Die scratch NE from the center bar of the E in WE. Reverse: Light die scratches on the left inner side of the O in ONE. Submitted By: Lloyd Hanson Cross References: CONECA: RPM #2, Coppercoins: 1930S-1MM-002 Comments: The photos of this variety were taken by John Bordner for the Wexler RPM Files.
1930-S 1¢ WRPM-003 Description: S/S East Die Markers: Obverse: Die gouge west of the horizontal bar of the 1st T in TRUST. A small die gouge (dot) at the rim NW of the top left of the R in TRUST. Reverse: A small die gouge (dot) can be found to the right of the upper T in CENT. Submitted By: Lloyd Hanson Cross References: CONECA: RPM #3, Coppercoins: 1930S-1MM-003 Comments: The photos of this variety were taken by John Bordner for the Wexler RPM Files.
1930-S 1¢ WRPM-004 Description: S/S West Die Markers: Obverse: WSW/ENE die gouge through IN. Series of short die scratches SW from the bottom of the 9 in the date. Reverse: Die scratch SW from the lower inner curve of the last S in STATES. Submitted By: Lloyd Hanson Cross References: None known Comments: The photos of this variety were taken by John Bordner for the Wexler RPM Files.
1930-S 1¢ WRPM-005 Description: S/S Northwest Die Markers: Obverse Stage A: Die gouge on the bust at the beginning of the lapel area. Die scratches SE from the bust, stronger toward the front. Strong secondary mint mark. Obverse Stage B: Weak secondary mint mark not showing the upper curve. Scratches from the bust are much weaker. Reverse Stage A: Dished mark between the RI of PLURIBUS. Reverse Stage B: Die marker weaker. Submitted By: Lloyd Hanson Cross References: CONECA: RPM #4 Comments: The photos of this variety were taken by John Bordner for the Wexler RPM Files. Stage A:
Stage B:
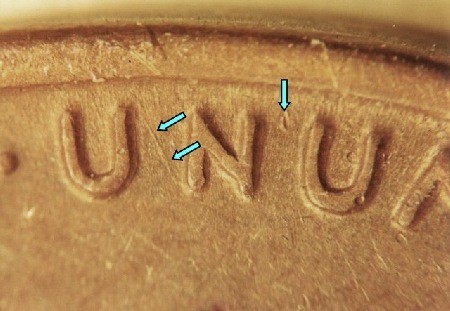
1930-S 1¢ WRPM-006 Description: S/S West Die Markers: Obverse: Die chip on the vest positioned south of the 1 in the date. Reverse: NW/SE die scratch between the first U and the N of UNUM. Die gouge between the N and second U of UNUM. Submitted By: Lloyd Hanson Cross References: None known Comments: The photos of this variety were taken by John Bordner for the Wexler RPM Files.
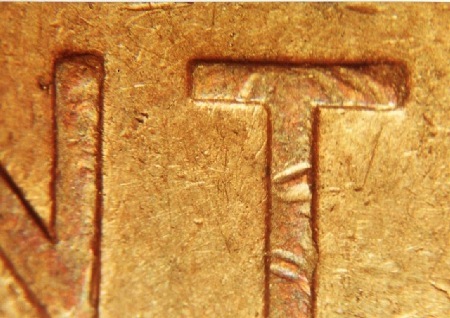
1930-S 1¢ WRPM-007 Description: S/S North Die Markers: Obverse Stage A: Long die scratch south from the L In LIBERTY. Obverse Stage B: Die scratch from the L in LIBERTY is weaker. Obverse Stage C: Die crack runs east from the rim at 7:30. Obverse Stage D: Die crack turns ESE over VDB and then turns SE near the last fold back to the rim at 6:00. Obverse Stage E: Die crack is much heavier and heavily chipped. Reverse Stage A: Die gouge at the left lower area of the second U in UNUM. Reverse Stage B: Weaker die gouge at UNUM. Reverse Stage C: The gouge at the U of UNUM can still be seen on less circulated example. Reverse Stage D: The gouge at the U of UNUM can still be seen on less circulated example. Reverse Stage E: A very weak gouge at the U of UNUM can still be seen on less circulated example. Submitted By: Lloyd Hanson Cross References: CONECA: RPM #5 Comments: The photos of this variety were taken by John Bordner for the Wexler RPM Files. Stage A:
Stage B:
Stage E:
1930-S 1¢ WRPM-008 Description: S/S West Die Markers: Very heavy die gouge from the rim at 11:00 running SE to the O in GOD. Reverse: Die scratch SSW from the top left of the T of CENT. Submitted By: Lloyd Hanson Cross References: None known Comments: The photos of this variety were taken by John Bordner for the Wexler RPM Files.
1930-S 1¢ WRPM-009 Description: S/S Northwest Die Markers: Obverse: Die scratches south from the 3 in the date to the top of the mint mark. Die scratch south from the bottom of the mint mark. Reverse: None visible. Circulated specimen was examined. Submitted By: Lloyd Hanson Cross References: CONECA: RPM #7, Coppercoins: 1930S-1MM-004 Comments: The photos of this variety were taken by John Bordner for the Wexler RPM Files.
1930-S 1¢ WRPM-010 Description: S/S North Die Markers: Obverse: Short N/S die scratch between the forehead and hair area. Reverse: Die scratches NE from the inside loop of the C in CENT. Submitted By: Lloyd Hanson Cross References: None known Comments: The photos of this variety were taken by John Bordner for the Wexler RPM Files.
1930-S 1¢ WRPM-011 Description: S/S North Die Markers: Obverse: None noted. Circulated coin examined. Reverse: None noted. Circulated coin examined. Submitted By: Lloyd Hanson Cross References: None known Comments: The photos of this variety were taken by John Bordner for the Wexler RPM Files.
1930-S 1¢ WRPM-012 Description: S/S East Die Markers: Obverse: None noted. Circulated coin examined. Reverse: None noted. Circulated coin examined. Submitted By: Brian Allen Cross References: None known Comments: The photos of this variety were taken by John Bordner for the Wexler RPM Files.
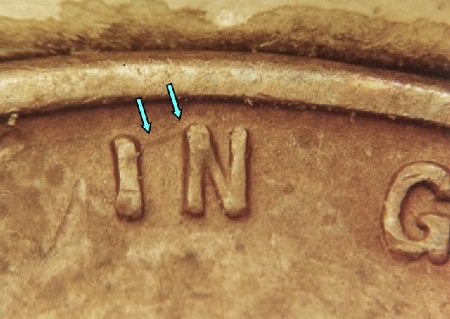
1930-S 1¢ WRPM-013 Description: S/S Tilted (Rotated) Die Markers: Obverse: Die gouge to right of N of IN. Small die gouge (dot) to left of lower mint mark. Reverse: Small die gouge touches right underside of central horizontal bar of E in CENT. Submitted By: Lloyd Hanson Cross References: None known Comments: The photos of this variety were taken by John Bordner for the Wexler RPM Files.
1930-S 1¢ WRPM-014 Description: S/S East Die Markers: Obverse: Die scratch ENE from vest to left of one in date. Die scratches SSW from bottom of R and T in LIBERTY. Reverse: Die gouge inside upper 1st U in UNUM. Submitted By: Lloyd Hanson Cross References: None known Comments: The photos of this variety were taken by John Bordner for the Wexler RPM Files.
1930-S 1¢ WRPM-015 “Best Of” Variety Description: S/S East Die Markers: Obverse: Die scratches NW from mint mark to 9 in date. Reverse: Short die scratch north from inside the right upright of the 2nd U in PLURIBUS. Submitted By: Lloyd Hanson Cross References: CONECA: RPM #6 Comments: The photos of this variety were taken by John Bordner for the Wexler RPM Files.
1930-S 1¢ WRPM-016 Description: S/S West Die Markers: Obverse: E/W die scratches beginning at D of GOD running through WE and 1st T in TRUST. Reverse: None noted. Circulated specimen examined. Submitted By: Lloyd Hanson Cross References: None known Comments: The photos of this variety were taken by John Bordner for the Wexler RPM Files.
1930-S 1¢ WRPM-017
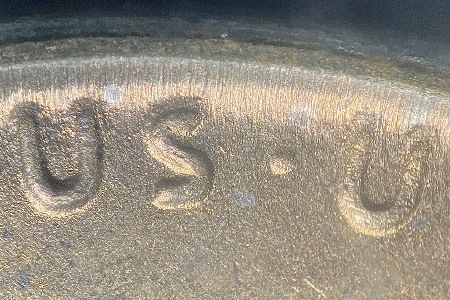
1931-D 1¢ WRPM-001 “Best Of” Variety Description: D/D Northwest Die Markers: Obverse Stage A: Shows strong secondary mint mark. Series of short strong die scratches from the right lower outer loop of the 3 in the date. Obverse Stage B: Upper curve of the secondary mint mark is weak and shows a NW scratch from the right upper side. Stage A markers gone. Very light die crack over VDB that is difficult to see on circulated examples. Reverse Stage A: Die scratches north from the outside left leg of the M in UNUM. North to south die scratch inside the second U in UNUM. Reverse Stage B: Heavy polishing lines north from EPU. Submitted By: Stage A: Doug Yost, Stage B: Lloyd Hanson Cross References: CONECA: RPM #1, Coppercoins: 1931D-1MM-001 Top 100 RPM: Wexler & CONECA
1933-D 1¢ WRPM-001 “Best Of” Variety Description: D/D East Die Markers: Obverse Stage A: Strong secondary mintmark shows well on the vertical bar and the curve to the east. Short die gouge east from the inside of the vertical bar of the upper opening of the E in WE. Obverse Stage B: Weaker secondary mint mark shows nice on the vertical bar but weaker on the curve to the east. Weaker gouge from the E of WE. Obverse Stage C: Very weak abraded secondary mint mark shows a partial curve to the east. Gouge at the E of WE abraded away. Reverse Stage A: Die gouge (dot) inside the R of PLURIBUS. Reverse Stage B: Die gouge abraded away. WNW/ESE die scratches inside the N of UNITED. Reverse Stage C: Weaker stage B markers still present. Submitted By: Stage A: John Wexler, Stage B: Lloyd Hanson, Stage C: John Bordner Cross References: CONECA: RPM #2 Stage A:
Stage B:
Stage C:
1933-D 1¢ WRPM-002 “Best Of” Variety Description: D/D West Die Markers: Obverse Stage A: Strong vertical bar of the secondary mintmark with remnants of a curve inside the primary mintmark. Obverse Stage B: Weaker secondary mintmark that is wavy from abrasion. The curve inside the primary mintmark is abraded away. Reverse Stage A: Die gouge (dot) inside the lower opening of the R of PLURIBUS. Reverse Stage B: Die gouge abraded away. Metal pull lines through UNUM to the rim. Submitted By: Stage A: John Bordner, Stage B: Lloyd Hanson Cross References: CONECA: RPM #1, Coppercoins: 1933D-1MM-001 Top 100 RPM: Wexler & CONECA
1933-D 1¢ WRPM-003 Description: D/D Tilted (Rotated) Die Markers: Obverse: Die chip (dot) centered above the date. Reverse: None visible. Circulated specimen was examined. Better examples are needed for examination. Submitted By: Lloyd Hanson Cross References: None known
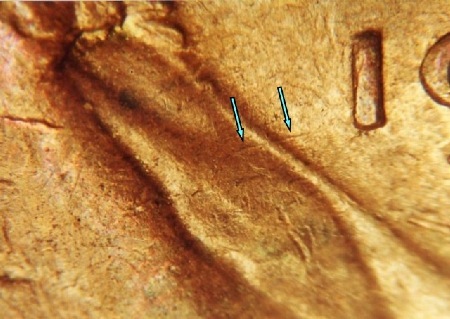
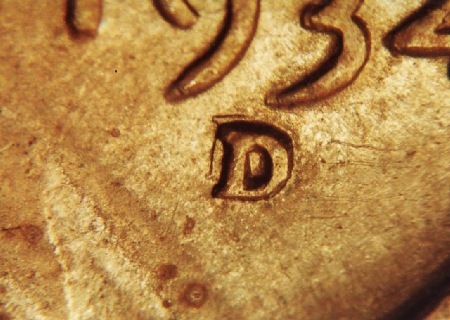
1934-D 1¢ WRPM-001 “Best Of” Variety Description: D/D West Die Markers: Obverse Stage A: Strong secondary vertical bar also showing a curve inside the primary mintmark. Die chip on the front of the neck just above the collar and NW from the bow tie. N/S die gouge on the upper vest fold near the lapel. Obverse Stage B: Secondary mintmark still shows inside the primary but weaker. Stage A markers still present. Obverse Stage C: Secondary inner curve of the mintmark no longer present inside the primary mintmark. Stage A markers still present. Obverse Stage D: Weak secondary mintmark showing a thinner west vertical bar. Very weak die chip on the neck. Reverse Stage A: Light die gouge to the right of the upper right-hand upright of the first U in UNUM. Reverse Stage B: Light N/S die crack on the left side of the left wheat lines. Reverse Stage C: Second die crack N/S through the upper wheat grains of the left wheat. Reverse Stage D: New reverse die has a strong die scratch north from lower inside area of the second U in PLURIBUS. Submitted By: Stage A: John Bordner, Stage B & D: Doug Yost, Stage C: Lloyd Hanson Cross References: CONECA: RPM #1, Coppercoins: 1934D-1MM-001 Top 100 RPM: Wexler
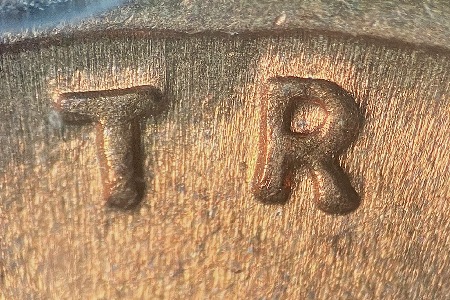
1934-D 1¢ WRPM-002 “Best Of” Variety Description: D/D Northwest Die Markers: Obverse Stage A: N/S die scratch inside the lower loop of the B in LIBERTY. NE/SW die scratch inside the upper area of the 9 in the date, closer to the opening. NE/SW die scratch at the upper opening of the 3 in the date. Strong secondary mintmark. Obverse Stage B: Light die crack through the R in TRUST running SW to the hair and then turning slightly and running WSW through the hair. Stage A markers still present but showing a weaker scratch at the 3 in the date. Slightly weaker secondary mintmark. Obverse Stage C: Heavier die crack through the hair. Die scratch at the 3 in the date abraded away. Other stage a markers present but weaker. Weaker secondary mintmark. Obverse Stage D: Stage A scratches abraded away. Very weak secondary mintmark. Reverse Stage A: Series of SSE die scratches from the left underside of the horizontal bar at the T of CENT. Reverse Stage B: Stage A markers still present. Reverse Stage C: Die chip on the left side of the left wheat at 9:00. A crack from the die chip runs NNE through the wheat grains. Stage A scratches abraded away. Reverse Stage D: New reverse die. Very short but heavy die scratch from the left side of the E of ONE, located about one-third the length of the vertical bar from the top. Submitted By: Stage A & B: Lloyd Hanson, Stage C: Doug Yost, Stage D: Brian Allen Cross References: CONECA: RPM #2, Coppercoins: 1934D-1MM-002 Top 100 RPM: Wexler Stage A:
Stage C:
Stage D:
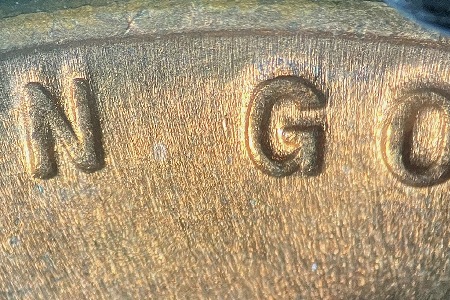
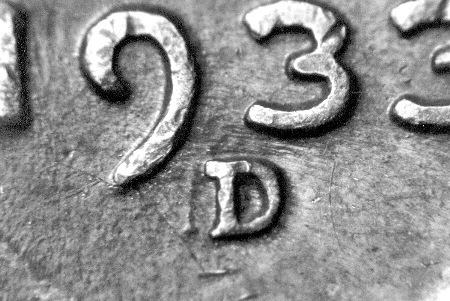
1934-D 1¢ WRPM-003 “Best Of” Variety Description: D/D/D/D South, South and North Die Markers: Obverse Stage A: X-shaped die scratches to the right of the mintmark. Two slightly curving die scratches though the 3 of the date. V-shaped die scratches south from the bottom of the 3 in the date. Fan shaped die scratches between the TY of LIBERTY. Series of WNW/ESE die scratches above WE. Very strong secondary mintmark shows three well-defined repunchings to the north, south and wide south. Obverse Stage B: All stage A markers abraded away except for very weak scratches above WE. Secondary mintmark well abraded and shows only a repunching south and a weak secondary north inside the lower area of the primary mintmark. Obverse Stage C: Die chip (dot) in the field east from the upper area of the N of IN. Only a secondary mint mark to the south is present. Obverse Stage D: Stage C die chip still present but weaker with NNW/SSE die scratches around the area. Mintmark reduced to strong abrasions. Reverse Stage A: NNE die scratch from the lower inside area of the C in CENT. Die gouge (dot) just above the left wheat stem. This gouge is positioned south when looking down from the space between the F and A in OF AMERICA. Reverse Stage B: Stage A marker still present. Reverse Stage C: Die gouge (dot) in the field below the right side of the U in UNITED. Stage A markers still present. Reverse Stage D: The two die gouges are weakly present; all other stage markers are gone. Submitted By: Stage A & D: Lloyd Hanson, Stage B: John Wexler, Stage C: Doug Yost Cross References: CONECA: RPM #3, Cherrypickers: FS-01-1934D-501 (013.81), Coppercoins: 1934D-1MM-003 Top 100 RPM: CONECA Stage A:
Stage B:
Stage C:
1934-D 1¢ WRPM-004 “Best Of” Variety Description: D/D North Die Markers: Obverse Stage A: Semi-circular die scratches from behind the head toward the jacket. Series of die scratches in the small open area behind the neck. Series of die scratches SSE from right-center of the Y in LIBERTY, with one scratch going to the jacket. Series of N/S die scratches inside the B and to the left of the I in LIBERTY. Series of SE die scratches at the bridge of the nose. Obverse Stage B: Stage A marker present but weaker. Reverse Stage A: Very light N/S die crack running along the right lower wheat grains. Reverse Stage B: Longer die crack on the right wheat grains. Light N/S die crack on the left upper wheat grains. Submitted By: Lloyd Hanson Cross References: CONECA: RPM #4, Cherrypickers: FS-01-1934D-502 (013.8), Coppercoins: 1934D-1MM-004 Top 100 RPM: CONECA
1934-D 1¢ WRPM-005 Description: D/D West Die Markers: Obverse Stage A: The primary mintmark is positioned lower than that seen on WRPM-001. A nearly vertical die gouge can be found near the front of the vest to the left of the date and mint mark. Two short die gouges north from the top of the 3 in the date. Die scratch SW from the left upper area of the mint mark. E/W die scratch center inside the D of GOD. E/W die gouges on the second and third vest folds and the last jacket fold. Curly E/W die gouge on the forehead just below the front hair. Obverse Stage B: Very weak secondary mintmark showing only a remnant at the lower vertical bar. Stage A markers abraded away. Obverse Stage C: Very short remnant of a secondary mintmark. Reverse Stage A: Die scratches SW from the upper inside and the left lower outside area of the C in CENT. SE die scratches from the right underside area of the horizontal bar of the T in CENT. Short NE/SW die scratch connecting the underside of the horizontal bar to the vertical bar on the E of CENT. Reverse Stage B: Stage A markers abraded away. Die chip (dot) above the left wheat stem positioned in a centered relationship between OF AMERICA. Reverse Stage C: None visible. Circulated specimen was examined. Better examples are needed for examination. Submitted By: Stage A & B: Lloyd Hanson, Stage C: John Bordner Cross References: CONECA: RPM #5, Coppercoins: 1934D-1MM-005 Stage B:
1934-D 1¢ WRPM-006 Description: D/D South Die Markers: Obverse: NE/SW die scratch inside the D of GOD. Short die scratch NW from the left top of the B in LIBERTY. Reverse: Numerous SW die scratches from the lower area of the O of ONE. NE/SW die scratches inside the first U in PLURIBUS. Submitted By: Brian Allen Cross References: None known
1934-D 1¢ WRPM-007 “Best Of” Variety Description: D/D/D East and South Die Markers: Obverse Stage A: Die gouges south from the lower hairline above the collar. Obverse Stage B: Shows only a weaker secondary mintmark to the east. Reverse Stage A: Short N/S die scratch right of the right upper area of the second U in UNUM. Reverse Stage B: None visible. Circulated specimen was examined. Better examples are needed for examination. Submitted By: Stage A & B: Lloyd Hanson Cross References: Coppercoins: 1934D-1MM-006 Stage A:
Stage B:
1934-D 1¢ WRPM-008 Description: D/D West Die Markers: Obverse Stage A: Primary mintmark is further east than WRPM-005. Numerous strong E/W die scratches through the upper area of IGWT. Inverted V-shape die scratches connect the lower area of the W and E of WE. Heavy and light E/W die scratches connect the legs of the R in TRUST. SE die scratch from above the bridge of the nose. Obverse Stage B: V-shaped die scratch at WE abraded away. Lighter die scratches through IGWT. All other stage A markers still present. Reverse Stage A: Series of slightly curving die scratches on the left side of the vertical bar of the T in CENT. Reverse Stage B: Stage A markers still present. Submitted By: Stage A & B: Lloyd Hanson Cross References: None known Stage A:
| ||